With the latest update to ReachOwl, connecting your social accounts like Facebook and Instagram now requires using a proxy. This ensures that your campaigns are processed on the cloud, allowing them to run smoothly even when your computer is off. Let’s walk through how you can easily get the right proxy and use it to connect your accounts.
Why Do You Need a Proxy?
Using a proxy is essential for running your social media accounts on ReachOwl. Here’s why:
- Cloud-Based Automation: Your campaigns will be processed in the cloud, allowing you to disconnect from your computer.
- Better Security: A proxy hides your real IP address, reducing the risk of your accounts getting blocked.
- Faster Results: With a proxy, your actions will be more reliable and faster.
Choose a Proxy Provider
There are several proxy providers available that can meet the needs for social media automation. Some of the top choices include:
- ProxySeller.com: Offers dedicated IPv4 proxies with unlimited bandwidth and HTTP support.
- Pricing: Starting at $1.13 for 1 proxy.
- Proxy-Cheap: Affordable static residential proxies with unlimited bandwidth and HTTP support.
- Pricing: Starting at $3.49/IP.
- IP Royal: Provides high-quality residential and rotating proxies.
- Pricing: Starting at $1.75/GB.


How to Purchase and Set Up a Proxy
Once you’ve chosen your proxy provider, here’s how to purchase and set it up with ReachOwl:
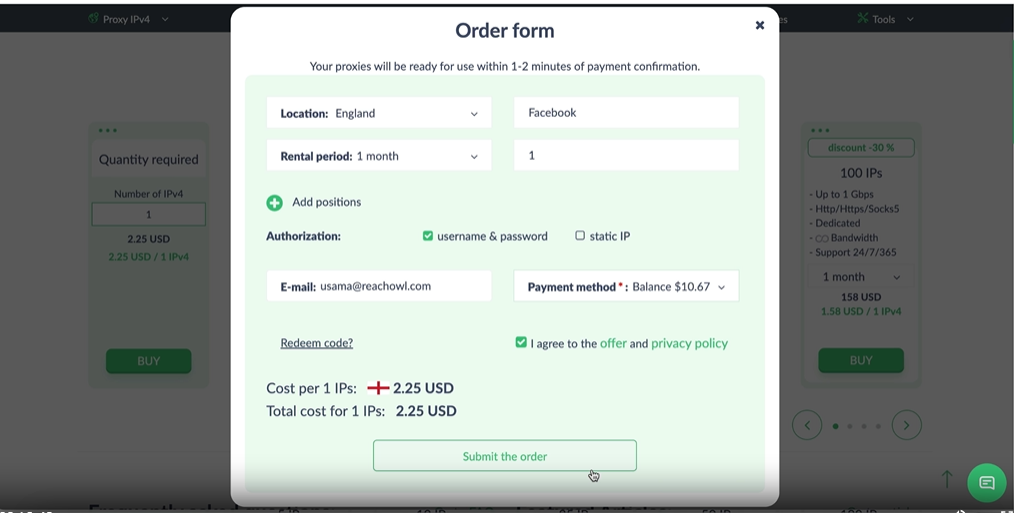
1. Purchase Your Proxy
- Log into your proxy provider account (e.g., ProxySeller).
- Choose IPv4 proxies for the best results with social media automation.
- Pick your location (e.g., England) and set Facebook as the proxy purpose.
- Confirm your purchase and complete payment.
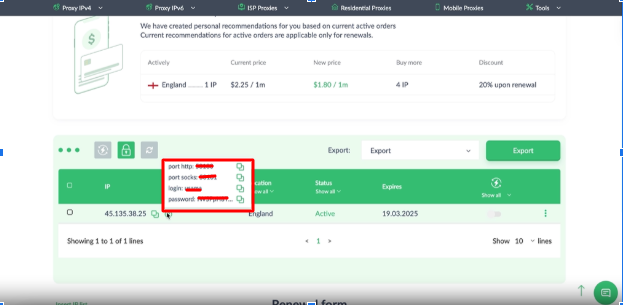
2. Get Your Proxy Details
After the purchase, you’ll receive the following proxy details via email or inside your proxy provider account:
- HTTP port
- Username
- Password
- IP address
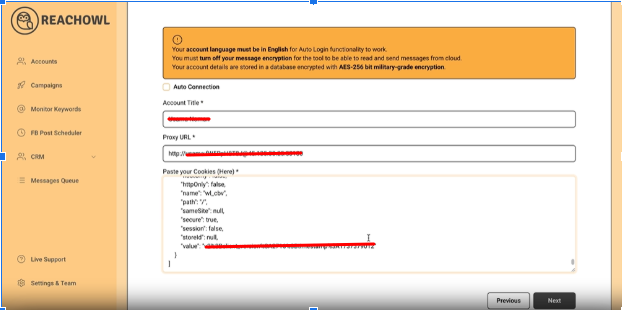
3. Connect the Proxy to ReachOwl
- Log into ReachOwl and navigate to the account connection section.
- Turn off auto-connection.
- In the proxy URL format, enter your details as:
HTTP://username:password@proxyIP:port - Paste your Facebook or Instagram cookies in the appropriate section.
- Click Save.
4. Verify the Connection
Once your proxy and account details are entered, ReachOwl will verify the connection. Your social accounts should now be successfully linked via proxy.
Conclusion
Connecting your social media accounts to ReachOwl using a proxy ensures better security and smoother cloud-based automation. Whether you choose ProxySeller, Proxy-Cheap, or IP Royal or any other proxy provider, simply follow these steps to get your proxy set up and start automating your social media tasks with ease.